

Hi Friends,
Taking another look back at a fun winter tutorial today!
Snowballs!
This post is from last year. Enjoy!
~~~~~~~~~~~~~~~~~~~~~~~~~~~~~~~~~~~
I wanted to share with everyone how I made my snowballs.

I did mine a little different than what I have seen out there. Same concept but being the thrifty queen that I am… I used what I had. And what I had… was 125 silk covered plastic ornaments. (If you don’t have ornaments you can buy Styrofoam balls. Try to get them on sale because they aren’t cheap.)

I decided these would work just fine. So I pulled all the silk off…

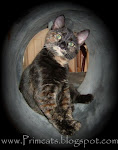
And gave Phat Boy a wonderful head of golden locks. Ha!

He did not appreciate it as much as I thought he should.

“I’m a boy. This is ridiculous.”

Ok… enough messing with the kitties. Back to the snowballs.
Mr. Primcat snipped the plastic nubs off the ornaments with heavy duty wire cutters. The ornaments also had holes in them so I just scotch taped them up.

And then came the messy part. Joint compound.
Put on some gloves… grab a glob in your hand and start smearing it on.

You get these. Let dry for 24 hours and repeat where needed. Let dry another 24 hours.

See how pokey they are...

Snowball fight anyone????? :)

I have my ammo prepared!

After drying… The snowballs will be pokey and pointy and you don’t want that. Hubby and I decided to sand them with 80 grit sandpaper to take those nubs off.
And here is the finished result.


Put them in bowls, jars, and baskets, under shoofly’s, on plates and tucked into shelves. I also found they are really cute sitting in the branches of your Christmas trees. Might theme one with them next year.
Another reason I really liked this project is that this is winter themed and can stay out months into the new year.
Merry Christmas!
Until next time…
Carmen and the Primcats


.png)


.jpg)


.jpg)


10 comments:
Such a busy lady you are...now you need to get those kitties some thumbs so they can help...lol But she looks so pretty sitting there watching with her fluffy yellow bow!
Thanks for the great tut...I love how you have displayed them.
Karen
I am wondering..can they be glittered also? Or spray glitter? Dianntha
Using the plastic ornaments would be a LOT cheaper than the styrofoam! Great tutorial!--Jan
Thanks Carmen for the tutorial.Aren't these messy but fun to make.LOL! Love your kitty.Christmas Blessings,Jen
Omg, the kitty pictures are hilarious!! Never thought to use those silk colored balls in that way...talking about the project here not the kitty! Thanks so much for sharing:)
~Lori
I love my snowballs that I got from you last year at Angie's Christmas open house!! My stinky little puppy stole the greenery off the wood plate yesterday. Now I have to get outside to my pine-tree to replace it.
I want to Pam's shop this past Saturday....so beautiful all decorated for Christmas. I got some great goodies. Hope to post about them soon.
Our little Chloe had to be rushed to the vet yesterday. Her allergies have gotten really bad. She scratched the fur off the side of her face while I was out shopping. Scared me to death when I got home and saw that the side of her face was raw and bleeding. She is on meds now and hopefully she will heal up real soon.
hugs,
Cindy
He really does look disgusted, but funny! Thanks for the tut on the snowballs. Take care, Janice
Cute goldiocks!
You did a nice job Carmen and it looks very nice.
Happy Hump Day
Earlene
Love them so cute
Great tutorial Carmen!! I have some of those ornaments & will be making some snowballs. Love your kitty's face....Really Mom. LOL
Have a wonderful day~Becky
Post a Comment